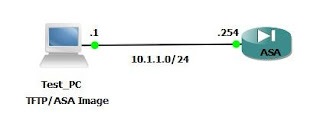
If incase ASA system image is lost or got corrupted we can recover it by booting ASA in ROMMON mode and executing following commands please refer above mentioned diagram.
Step 1: Make sure you have assigned the right IP address to the PC which has ASA system image and tftp installed.
Step 2: Set the following parameters
rommon #0> address 10.1.1.254
rommon #1 > server 10.1.1.1
rommon #2> interface GigabitEthernet0/0
GigabitEthernet0/1
MAC Address: 000f. f775.4b54
rommon #3> file asa801 -k8. bin
Step 3: Verify your configured parameters in ROMON mode
rommon #4> set
ROMMON Variable Settings:
ADDRESS=10.1.1.254
SERVER=10.1.1.1
PORT=GigabitEthernet0/0
VLAN=untagged
IMAGE=asa801-k8. bin
CONFIG=
rommon #12> set
ROMMON Variable Settings:
ADDRESS=10.1.1.50
SERVER=10.1.1.1
------- output omitted for brevity -----
rommon #13> unset ADDRESS
ROMMON Variable Settings:
ADDRESS=0.0.0.0
SERVER=10.1.1.1
GATEWAY=0.0.0.0
------- output omitted for brevity -----
Step4: Check the connectivity from both sides:
rommon #6> ping 10.1.1.1
Sending 20, 100-byte ICMP Echoes to 10.1.1.1, timeout is 4 seconds:
!!!!!!!!!!!!!!!!!!!!
Step 6:
rommon #5> tftpdnld
tftp asa821 -k8. bin@192. 168.10. 250
!!!!!!!!!!!!!!!!!!!!!!!!!!!!!!!!!!!!!!!!!!!!!!!!!!!!!!!!!!!!!!!!!!!!!!!!!!!!!!!!!!!!!!!!!!!!!!!!!!!!!!!!!
Device downloads the system image file in the memory and Boots up. Note it is not stored in flash. So once ASA is up you have to manual upload the ASA system image in the flash.
Step 7:
ASA01(config)# copy tftp: flash:
Address or name of remote host [] ? 10.1.1.1
Source filename] ? [ asa821- k8. bin
Destination filename []?asa821 -k8. bin
Accessing tftp://10.1.1.1/asa821- k8. bin. . .!!
Writing file disk0:/asa821- k8.bin. !!!!!!!!!!!!!!!!!!!!!!!!!!!!!!!!!!!!!!!!!!!!!!!!!!!!!!!!!!!!!!!!!!!!!!!!!!!!!!!!!!!!!!!!!!
! Output omitted for brevity
51 24096 bytes copied in 1 51. 370 secs ( 33934 bytes/sec)
Step 8: (Optional)
You can execute following command to hardcode the ASA image you want ASA to boot. It is especially useful when you have multiple ASA images in the flash and you want to boot up with specific ASA image.
Chicago(config)# boot system disk0:/asa821- k8. bin
Hello Saju....
ReplyDeleteThanks for ur blog. its ws very helpful 4 me.
Thank you very much for your blog, it enabled me to un-brick an old ASA5505 firewall! Keep up the good work :)
ReplyDeleteMike
After the ASA boots, it displays the command prompt.Typed enable and pressed Enter to get into privilege mode . Pressed Enter at the password prompt but it does not accept it and says invalid password.
ReplyDeletecisco>enable
Password: